
During our many visits to display homes, we often noted the use of wood trim on top of the wooden floors, next to the skirting boards.
We asked our Sales Consultant about this and he said it was called ‘quad’. We don’t like the look of quad, why don’t you just use the skirting board to hide the rough edges where the floor meets the walls? He told us that there needs to be a gap of around 10mm between the walls and the floorboards as the extreme range of weather conditions here in Melbourne can cause your floorboard to expand and contract. When I asked him why they didn’t just use the skirting to cover this gap, he didn’t really give me an answer, just said that Porter Davis always install their timber and laminate floors this way.

“well, that’s not really good enough”, I said to myself using my internal voice and my external ranting voice to Dave when we were safely in the car. How are we going to get around this? I’m not happy about having this ugly quad everywhere. I was brought up with the mantra ‘Do it once and do it right’. There is no way that this tacky band-aid of a solution is going in my home!
Skirting
To Paint Or Not To Paint – That Is The Question
Having decided that we would get our flooring done post-handover, we asked our BC if we could have the downstairs skirting painted and left off and the upstairs painted and installed (we would then pay to have downstairs installed once the flooring had been laid). We were informed that it was either painted and put on or left off and unpainted. The plain strips would just be left in the garage. So we opted for on and painted upstairs + guest room downstairs where the carpet was going and off and unpainted for the rest of downstairs area.
However, as often happens, the best-laid plans of mice and men often go awry. PD changed their policy on us. Our contract meeting happened part way through our flooring research marathon, so when we got to our Contract meeting and our Contract Presenter told us that the whole house either had to be on or off, I was a little unsure of the right decision. Apparently, it was too hard for the installers to get it right with everyone wanting custom skirting installations.
Now there are two reasons why I wanted the skirting put on after the floorboards. A. To cover the gap between the floor and wall but also, B. when the skirting is put on before the floor goes down, it always looks too short. Like its dwarf skirting, a mean thin little line around the edge. Especially if it has a wave or any detail on the top half. 
So do we get PD to paint and install the lot or leave it all off? I should mention that our skirting is coloured and it’s not the wall colour. We are doing Cloudy Sky archs, skirts and doors with a Kitty Grey wall colour.

Leaving it off and painting it after would mean I would be spending a lot of time on my knees with masking tape and paintbrush in hand. I had no desire to spend days crawling around on the floor painting. Oh, my knees and back ache already just thinking about it.
I was sitting in the contract meeting being asked to make a desition on the spot. Now I can be decisive as hell when it comes to choosing what wine to drink or where to go for takeaway dinners, but everything else in my life takes time. I like to assess my options, find out all the pro’s and con’s, understand what the ramifications will be. Then once I’ve made my mind up, that’s it, I’m as stubborn as an Ox (which just happens to be my Chinese sign – the Fire Ox.) So here I am, we had only done part of our research into what flooring we would get, but I was confident that I didn’t want to paint the skirting myself. I had made my plan and now I was being asked to change it at short notice and they wanted an answer then and there. Well, I don’t react well to these situations. I froze. Sometime later the neurons started firing again in my brain and I rejoined the conversation. My husband had ordered taller skirting and everything would be installed and painted. Wait, what, hang on – does that mean I’m going to have to have the quad? At the time I was in shock, not having fully processed it all, but didn’t have a better option so Dave and the Contract Presenter moved on to the next item.


Dave and I have no life, we spend all our weekends and evenings working on this house, so dedicating all of our time to visiting display homes and researching different options doesn’t phase me. What does start to become tiresome is after the 5th weekend of visiting flooring stores we still had not made a decision. We don’t do things by halves and we want to know all our options, but display homes have this great thing where they don’t open until 11am. I enjoy my sleep-in and lazy breakfasts. Floor stores, however, keep standard shop hours and open at 9am. So on weekend number 5, having been dragged out of bed every Saturday and Sunday before 8am to drive to god knows where to look at Carpet and Timber flooring shops – I had had enough.
Heres what we found out along the way. (Without the sales angle or pushy shop assistant getting in the way.)
Wasteage
Our house has 93.52m2 of floor area downstairs, not including the guest room which will be carpet and the bathroom and laundry that are tiled. Flooring companies allow for 7-10% wastage, this includes getting a box of spare boards that you stick in the garage for spare parts. So 100m2 of flooring has been quoted in the below costing and plans.
Laminates
If you buy a laminate floor it will always have a repeating pattern. A picture of timber is impregnated on a board giving it the identical look of a timber floor. There are normally about 8-12 different photos. so for example, every 8th plank will have the same image.
Some laminate manufacturers say they don’t have a pattern repeat, this means they still have the same number of photos of wood they use, but they move the image around on the boards so the pattern does not appear in the same spot twice. If you have a knot in the bottom left of one board, that exact same knot might then be located in the centre of another board three over from it.

Laminate flooring works on a tongue-in-groove self-locking system. No glue or nails are necessary, this is why it is great for a DIY job. The surface material is joined to an MDF composite. Depending on the quality, the surface material varies in thickness. The top of the range is composed of high-quality plastic laminates that are very hard wearing, similar to a Laminex bench-top. This is why Laminate is promoted as being ideal for houses with kids and pets as it is hard wearing. At the other end of the scale are the low-cost options. They are effectively a sheet of printed paper laid over the top of MDF board with a clear coating on top. Like everything, you get what you pay for and once you scratch the surface, all you have left is plain MDF board.
Laminate Lifespan
Its lifespan is typically between 15-25 years, but this shortens to 10 years or expands to 30 years depending on the quality you brought, how it is installed and the amount of traffic it receives.

Laminate costs
Porter Davis has Categories 1-7. The low end, Cat 1, 2, 3 is laminate pricing. I think Cat 5 and 6 is floating Engineered Timber and Cat 7 (their Oak range) is Direct stuck Engineered timber. I’m not sure what Cat 4 is sorry. If you know please comment below. More about Engineered and Direct stuck further down the blog.

Be aware, if you take the PD promotional package that is $9,999 for Cat 1 flooring to the whole house, they will only credit you back their cost of the flooring and not the labour component of the package, when you upgrade to higher category flooring, then you end up paying double the labour.

We were looking to upgrade to Cat 2 laminate from our $10k promo pack. We were quoted $10,075 dollars with approx. $3500 to be credited from Cat 1 inclusion. $6,500 difference. $16,500 for Cat 2 laminate and Cat 1 carpet – what a joke, this completely put us off and we started to look at getting it done post-handover.

Engineered Timber
An engineered timber board consists of more than one layer of wood. one thin layer of premium timber on top and multiple layers of substrate, these are either plywood or natural fibrous wood such as rubber tree. The layers are stacked with the grain running perpendicularly. Making it virtually impossible for the timber to swell or shrink when the temperature and humidity changes. Creating a more stable product.

The top layer of wood is between 3mm to 6mm thick and pre-dressed with a polyurethane coating. This is one of the reasons why engineered timber can be more cost-effective than solid timber flooring. The manufacturer can create more floorboards out of one tree by cutting the strips so much thinner. The installation is quicker and cheaper as the boards have already been sanded, stained and coated with solvent-based coatings. making them pre-finished, reducing the installation labour dramatically.
Sanding an Engineered Timber Floor
Most engineered timbers come in 3mm or 6mm thickness of the top layer of hardwood, the cost difference is noticeable. These can be sanded and re-finished. Sanding will take around 1mm off the top of your engineered floorboard. The minimum thickness that can be sanded is 3mm, therefore you can only rejuvenate a 3mm board once. Obviously, with a 6mm board, you can do this a couple of times.

Insulation
If you do a floating floor it can also have insulation under the floorboards. This is a sheet of foam that has a waterproof backing on it (to stop moisture from seeping into it from the concrete slab) and can also reduce noise transference by a few dB.

Plywood Substrate v Timber Substrate
In our travels around flooring shops, some companies promoted that their engineered timber was on an HDF backing (High-Density Fibre), like MDF but high not medium. Other companies would wave their flag and say our flooring uses natural solid timber layers as its backing, it’s way better. No one has been able to tell me why it’s better, just that it is. So who do I believe? Well from what I can tell when they use fibrous wood like the rubber plant instead of a compound like HDF, its greener for the environment. That’s it – that’s all I’ve got.

Floating floors vs Direct Stuck Floors
I never knew the difference between a floating and direct stuck floor until a sales guy bounced a ball in front of me. I was always under the impression that solid floors were directly stuck and engineered timber floors where floating, however, this is not the case.
Standing in the display shop the salesman asked if I could tell which of his floors were floating and which were directly glued down to the concrete slab. I looked at him blankly, making sure my mouth was closed so I didn’t look too dumb. He pulled out a hard rubber ball and bounced it on the floor, thowak, then he took a step to his left and bounced it again on a different floor sample, doumf, he could have bounced it on the concrete outside and it would have sounded the same, no reverberation, no hollow sound, hardly any noise at all, just a dull thud. I was super impressed. He asked me to walk the length of his showroom in my high heels (yes I wear high heels at 9.30am on a Saturday morning when most females are dressed in activewear.) So I started to walk, really getting into this catwalk performance and strutting my stuff. It was amazing to hear the difference between the sample areas and suddenly I understood why some places, no matter how lightly you tippy toe, it sounds like your pounding away.
In our last house, Dave always complained that I sounded like a horse coming down the hallway as I clip-clopped my way to the kitchen, dressed for work in my high heels. Now I know why it was always so noisy – because the floors were floating and not direct stuck.

Floating floors are generally installed on a concrete slab. The floor is not actually connected to the slab or any surrounding surface. It’s standard practice to lay a foam membrane underlay first, then lay the interlocking floor product on top. The interlocking elements are not glued, attached or nailed. This leaves room for them to expand and contract. A 10mm gap is left around the circumference of your floor. This is why quad is needed to hide the huge Grand Canyon-size gap.
One of the only negatives we can find about a direct stuck floor is that if you did do something horrendous to a floorboard and needed to remove it, it’s not easy. You would need to cut it out like you would a broken tile. A floating floor you could at least pull off the skirting or quad and start un-clipping the flooring and make your way over to the damaged board to remove it. However, flooring relaxes and creates a memory so it is strongly recommended that you re-lay the floorboards in the exact same order and position.
Direct sticking costs a little more, for us, it’s about $20per m2 as the glue they will use has the waterproofing included in it and it takes a little more labour. Approximately $2k extra for us. Which I will pay and know I am not going to wake the whole house up in the morning when I have my shoes on.
Floorboard sizes
The typical sizing that you will see around for engineer timbers are 180mm wide x 1.8m or 220mm wide x 2.2m. Some places do a 400mm wide board, however, I think they are so wide they start to look fake.

Parquetry
You either love it or can’t be bothered with it. I do love it but can’t afford it.
We were quoted an extra $40 per m2 for parquetry.


Our choice
We are going with O’Brien Timber Floors, they were the most knowledgeable and had the best offerings. We also felt the most comfortable with their warranties and installation process.
https://www.obrientimberfloors.com.au/store/timber-flooring/engineered-timber

Competitors quote for the same flooring.

Solid Timber
As the name suggests the timber floorboards are manufactured from a solid piece of timber. Solid timbers have natural insulation and natural warmth properties.
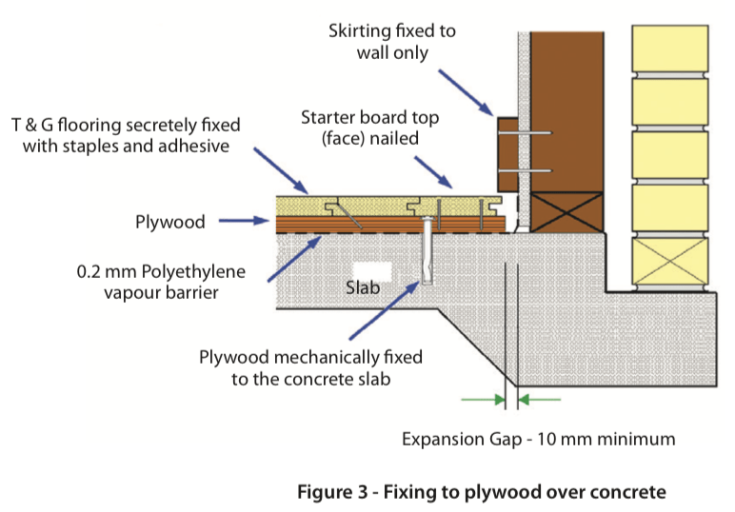
It can be laid on top of a timber subfloor or a concrete slab. With a timber subfloor, the process is to lay down plywood sheeting that covers the whole of the floor area. The timber boards are then glued and nailed down to the sheet flooring and into the subfloor framing.
With a concrete slab a plastic membrane is laid down, then a plywood base is nailed to the concrete, the solid timber flooring is then glued and nail to the plywood base.
One of the most popular solid timber floors is Tasmanian Oak, which is actually not an oak at all, it is a eucalypt. This is one of the more cost effecitive options in the range of hardwood flooring.
You can sand and refinish a 20mm thick floor board approximately 5-7 times over its lifetime. Sanding every 15-20 years, again depending on the amount of traffic it receives Making its lifespan over 100 years.
Solid Floor Costs
Below are three quotes all from the same company. The last one is however for Engineered flooring.


Janka rating
The Janka rating is a test that measures the degree of hardness each species of timber possesses. A steel ball is pressed half its depth into the wood. The higher rating the harder the wood, meaning it will be hardwearing, more durable and longer lasting because of its density. These also tend to be more expensive due to the difficulty of working with it compared to other timbers, requiring more time and labour to install.
These are recommended for high traffic areas of the home.
Softwoods with a lower Janka rating can be hardened with a polyurethane coating. Classic Pine floors that you see are a good example of a softwood floor. Softwoods do handle seasonal and environmental changes better than hardwoods, as they are less dense, this means a smaller likely hood of expansion and contraction.

Inclusions
Whether you pick solid or engineered floors they will both showcase the beauty of natural wood, including its knots, grains and flaws, creating the unique character and charm of wooden floors.
Fashions change and currently, floors with lots of imperfections visible are on trend, its called Feature Grade. Surprisingly these are actually cheaper than floorboards that have little or no inclusions in them, however, the high demand for them currently means they are harder to source and likely to increase in cost in the near future.

All flooring will fade, darken or change tones slightly over time due to UV exposure. Remember to move your rugs around or you’ll have a permanent dark square on your floor.
Topography
Dave really likes the feel of real wood, to feel the grain and see the groves and valleys. There are many different styles of finished floors and we have chosen to see and feel the grain. You often will not get the topography when you opt for a high gloss finish.

Bevelling around the edge
When searching for your timber floor, keep in mind the look you want your house to have. Some woods are a square edge all the way around the plank, giving you a flat finish between the boards, others are mitred on both sides but square edged at the top and bottom, this means your house looks like it has long and skinny boards running the whole length. Others, the ones we personally like, have a mitred or bevelled edge on all 4 sides, making the plank standout and be defined.


Typically high gloss floors do not have a Bevel on them. So when considering a floor, also have in mind if you like the Gloss or Matt finish… So many things to consider.
Samples – from your home and the shop
Be careful when looking at samples, the colours can be very deceptive. In samples, the dark floors such as Jarrah may look terrific, but when it is covering your whole floor it can make your house very dark. Try to view your options in as large a sample area as possible. Also move it around, take it inside and outside the shop to look at it in natural light, it makes a huge difference. Dark floors also show up the dust. Light coloured woods don’t show the dirt or dust marks as easily.
Shop Samples, you will be surprised how many shops let you borrow their only sample and take it away, some places didn’t even ask my name, others just took my name and phone number. On one of the days, we had 4 shop samples in the car, we also had a chair from our dining table set, a small bookshelf from our 6 pieces bookcase set and a drawer out of our side table and coffee table set. These are the 3 main timbers we currently own and we wanted to make sure they would work with our new floor.
So we arrived at the shop who had our favourite timber and colour, unloaded the 4 other samples, a chair, a bookcase and a drawer and spread them all out next to the current front-running timber in the Flooring Xtra shop. Now, this is not a typical thing you see happen, but it was amazing to see all the samples together. The mind forgets colours and does not remember tones and shades. We moved the different samples around and quickly dismissed 3 of them, the 2 front-runner samples were hauled out into the parking lot along with the bookcase, chair and drawer and looked at in natural light. I didn’t LOVE either of them but knew which one suited our colours and furniture the best.
On week 4, we walked into O’Brien Timber Floors and I knew I had found my floor, instantly I loved it! The colour, topography, board width and price were all correct. We went back the next weekend with bookcase, drawer and chair in tow and it all worked together like magic. When you find your floor you will know it. He only had a metre long parquetry board to offer as a sample, which we happily accepted. (much better than a tiny sample)
I wanted to know how it would stand up to being in a high traffic area, so for the last 2 months, it has lived in the car, being battered and bashed about. Every day when Dave and I catch up for lunch together (we only work 200m apart at different companies) we pull the board over to the front seats of the car and eat our lunch off of it like a table. It’s been great to see it take the knocks and scratches and I am confident that it will handle our lifestyle..

This is a photo of our oak sample that we are buying, sitting on top of a Porter Davis oak floor.
Stop scrolling – you need to read this part!
Quad
This was talked about at the very beginning. No need to repeat myself.

Caulking
Caulking can be applied only to floors that have been directly stuck. Because the floor has been glued to the substrate ie the concrete slab and can only move 1 or 2mm. This means the flooring can be laid as close as 3mm away from walls (or skirting), creating a very small gap between the skirting and the floorboard.
This is then filled in with caulking. The caulking can be colour mixed to match either your skirting or kitchen island/cabinets or your floor colour.
This is how we are getting around the quad issue!

Under Cutting
Undercutting is when a power tool is used to cut the lower part of your skirting and architraves out and away. This means that the floor can be slid under the now created gap, giving the illusion that the skirting was laid after the floor was put down.

The downside of undercutting is that the power tool is hand held by a human and the subfloor may not always be dead flat. Waves and uneven cutting can occur. Then you are left with a 1 or 2mm gap between the floor and the skirting board. If it is a floating floor, you will not be able to caulk this gap. Also, flooring is laid from one side of the room to the other, so one side will have the floor slid under the skirting but what happens when the installer makes it all the way across to the other side, he cant click in the tongue and groove and then slide it under – it doesn’t work like that.
Undercutting, however, is nearly always used on door architraves. We will also be getting our bottom staircase step undercut. But I’m not convinced about letting the guy cut into my colour tech (two PAC) kitchen island skirting.

Steam Mops
I have a steam mop, we got it free when we bought a vacuum cleaner, it rocks! But I live in a rental, we don’t have kids or dogs and I only mop the floors every couple of months. There is no way I will be using the power of boiling steam on floors I have personally shelled out $15k for.


The Alternative
Enjo cleaning mops are the way to go. They don’t use chemicals and are the quick and simple way of keeping your house clean and your floors in showroom shine condition.
https://www.enjo.com.au/floor-care.html?p=all
Screeding or Self-levelling
For a floating or direct stuck floor the rule of thumb is that the sub-floor can be out by 3mm over a 3m radius if it is more then this it will need screeding or a self-levelling compound poured and set hard before the floor can go down. It is even more important if there are steep hills and valleys rather than the long undulating waves. For example, 3mm over 3m is ok but 3mm over 500mm will create a void between board and sub-floor. This will cause your floorbaords to creak and bow over time.
The building res code says the sub-floor or slab must be no more than 8mm over a 3m radius. So I’m guessing we are going to be using some self-levelling compound to even out the floor.
We have been quoted a worst case scenario as a ballpark figure, if our entire floor needs a 5mm screed, then it would cost us $2000. The chances of the whole floor being out are almost 0, we have been reassured that a usual levelling job would cost between $250 to $500 for a new build like ours. Until the slab has been inspected by our flooring company we will not know the accurate cost for this.

Transitions from tile and carpet to your wooden floors
Thinking about the heights of your flooring for a moment. If you want a more consistent finished surface throughout your home, keep in mind how many areas are transitioning from one surface to another as you step-down or up could become an eyesore. I have 2 doors that lead from timber to tiles and one from timber to carpet.
- Laminates are around 8mm high plus 2mm of underlay.
- Engineered floors are typically 12mm-14mm plus 2mm of underlay or glue.
- Solid timber is about 19mm-21mm plus 10mm-12mm for the plywood base.
- Tiles are approximately 10mm-14mm but can be up to 19mm for the flash ones.
- Carpets range depending on your pile, plus the carpet gripper that goes across the doorway and 10mm of underlay.
- 40 oz 10mm – 11mm
- 50 oz 11mm – 12mm
- 60 oz 13mm – 14mm
- 80 oz 16mm – 17mm
Some interior designers prefer the carpet to be slightly higher than the adjacent flooring so that the carpet appears to be more abundant.


The other reason to keep this in mind is your kitchen bench working height will be affected. I come from a tall family, my Dad is 6ft 6″ and growing up we had tall bench tops, I find it hard on my back leaning over short benches. Also, I like to cook while wearing my shoes, typically these are high heels, so I wanted to make sure the bench height would be high enough that I wouldn’t have to bend down while preparing food. We have set our bench tops to 950mm high knowing we will lose at least 18mm with the flooring.

Also while we are on the subject of kitchens and flooring, just a note – do you like the kickboard sticking out or do you like it recessed all the way around. If you do get quad – this is what it will look like. I asked at our Kitchen Culture meeting to have mine look like the left-hand side photo as I don’t like the dust trap that the right-hand one creates.


Warranties
If you are installing your floor post-handover, ask who will be warranting the materials and installation. We found in our travels some companies would warranty both parts and others only covered the timber but you would have to go directly to the installers if it was an installation error. Even if you didn’t engage the installers directly but the company you brought through did. This was one of the main points that put us off Flooring Xtra. I dont know the installers, I have nothing to do with them, but they are who I would have to chase and deal with if somthing went wrong in 5 years time.

Conclusion
So you are in the position that we are, you’re getting your skirting attached to the walls – what are your options?
- Laying Quad next to the skirting boards, which goes on a floating floor.
- Having caulking on a direct stuck floor.
- Or undercutting the skirting – but you need a damm good installer with time and patience!
Looking back now, everything has worked out and it was a great decision to have the taller skirting painted and installed.
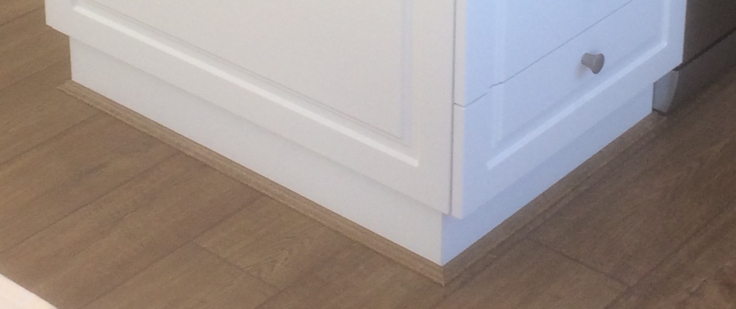
This is what the extra tall skirting will look like with timber laid after, the photo also shows the caulking on a direct stuck floor and an undercut bottom staircase step.

The carpet is on another blog – this one is way too long already 🙂
Added 16.1.2018
I have been asked these questions and thought I would update the blog with the questions and answers for others to read.
Q “Could another option be to Remove the skirting entirely and lay the floorboard and then install skirts on top of it”
A. Yes, we looked into this, I forgot to mention it. The thing with PD is that they attach the skirting and then paint the wall and skirting together. So you would have to cut the paint line, then pull off the board, then reattach the Skirting after. Because skirting is cut from a very soft wood, it shows up all the hammer and crowbar marks. Effectively you would be putting on 2nd hand skirting and it no matter how careful the builders were at removing and re-attaching the boards, you would still see knocks and dents on the skirting. Then you would need to fill the nail holes and fill, sand and repaint.
If you are going to go to this much hassle and spend extra on labour to take it off, then I suggest just having them left off in the first place.
Q. “For direct stuck timber would it feel too hard as there is no underlay?”
A. I asked this question a few time, personal I couldn’t tell the difference between the hardness in the showroom. One sales guy said flippantly to me “only if you stand on them for an 8-hour work shift would you notice the difference.”
The underlay is only 1-2mm of foam, I don’t think its enough to notice in your body, its only enough to help level out the floor so it doesn’t squeak.
Q. “Also would you miss any insulation benefits.”
A. The glue they use is very though and has a waterproofing quality to it. I believe this stops the damp from rising and gives the same or better benefits.
Q.” Also for direct stuck timber since its glued how the transition from tiles or carpet would look like?”
The last contractor in, does the capping or transition strip.
With direct stuck engineered or solid timber, they can shave the bottom of the board that is next to the tile or carpet, so it has a tilt to it, making the transition less noticeable and leave the job looking like a higher quality finish. He said if its a big difference, 20mm of so, the slop would start further away from the door so you didn’t trip. This all depends on the installer and was another reason we chose O’Brian Timber Floors.

I laughed our loud (or lol’ed as the kids would say) at ““well, that’s not really good enough”, I said to myself using my internal voice and my external ranting voice to Dave when we were safely in the car”. Poor husbands everywhere endure the external ranting voice.
LikeLiked by 1 person
Excellent blog here! Additionally your site quite a bit up very fast! What host are you the usage of? Can I am getting your associate hyperlink for your host? I desire my site loaded up as quickly as yours lol
LikeLike
I am not positive where you are getting your info, however good topic. I must spend a while studying much more or figuring out more. Thanks for fantastic information I used to be looking for this information for my mission.
LikeLike
Hi Alex
My information comes from many many different people that I talk to about the area I’m researching, not just one person or company. Then I put it all together and determine my own conclusion.
Hope it helps. C.
LikeLike
Wow, fantastic weblog layout! How long have you been running a blog for? you made running a blog look easy. The whole look of your website is excellent, as smartly as the content!
LikeLike
Hi Alex.
I use WordPress for my webside hosting https://wordpress.com/
Thanks, C.
LikeLike
Great blog.. only I would add a couple of extra points. Keep in mind that if you are going to sand an oak floor you will need to re stain the whole floor unless it is a natural oak colour. A good installer will glue every tongue as well as underneath… preferably direct stick should be on ply board or similar to allow for secret nailing which is more secure and solid over a long period. And finally if you would like a competitive quotation let me know 👍
LikeLike
Hi Georgie
Thanks for the extra pointers. It sounds like your a professional, I however am only a layman when it comes to the world of building. I could have writen twice as much more on the subject but you have to stop at some point. I have approved your comment so others can read your helpful remarks and so they could click on your name to get a quote.
Thanks C.
LikeLike
Hi Georgie….could you please get in touch with me. Interested to hear from you on flooring options.
LikeLike
Do you have more pictures of caulked sideboards? We are going this path and would love to see the finish product. I am worried as I am thinking about future maintenance! And if the caulking would look very gummy.
LikeLike
Hi Lui
Now you know what to look for, you will see Caulked skirting everywere. I have it in the current rental I live in and the caulking is not gummy or discoloured – I guess its like caulking in the bathroom – if its done right you will never notice it, if its done porly then you will pick up on it right away.
Cheers C.
LikeLike
Your brilliant. PD should headhunt you to head WOS re invention. ( At narrowed to one design stage)
LikeLiked by 1 person
lol I’m not sure they would see past my passave aggressive comments. But yes I do think I could help them a lot.
LikeLike
Thank you SO much for this blog. We are only just in the process of looking at doing a knock down rebuild and the only thing I’m sad about is losing my beautiful hardwood floors, this makes me much more positive!
LikeLiked by 1 person
Just to confirm – You guys paid for cat 1 flooring to PD as well ?
LikeLike
Hi, no we had all the PD flooring costs removed from our contract. Only the tiling flooring stayed as it’s required for the wet areas.
LikeLike
Thank you. I was confused because you said -“This is a photo of our oak sample that we are buying, sitting on top of a Porter Davis oak floor.”
Is that just for the picture ?
We are going to go laminate ( we have a little one). We asked PD to remove our flooring pack today. I am so stressed out now about the skirting that something is going to be messed up. My apologies for asking this silly question in advance – What method did you guys use to avoid quads ? I am sorry I am getting a little confused. Totally blame this on stress lol. Does O’Brien offer installation as well ? Would PD know the right amount of space to leave between skirting and floor ?
Thank you in advance xx
LikeLike
Hi Chester
Believe me, I know all about the stress PD can course. Our floorboards are not purchased via PD, but I sat it on top of a PD floor to show the colour difference.
We have gone with a direct stuck floor (gluing them to the concrete) to avoid the quad and the boards will be laid next to (not under) the skirting.
You can direct stick laminate as well.
PD will not leave a gap under the skirting for the boards to slide under but you can have the skirting undercut – refer to the above blog for undercutting info.
Hope this helps 🙂
Cheer
Charlotte
LikeLike
Thanks for sharing your research with us, this is really great.Have you already installed your floors? How did you go? I am also looking to do o’briens timber floor. Possible to get the same colour as you, which is very similar to the PD C05.All the best, take care.
LikeLiked by 1 person
Hi, no we have not installed them yet as the house is not ready. Charlie seems like a great guy and we are excited to use him.
LikeLike
Hi there, great blog – thank you. Just wondering if you have had the floors layed, and if you are happy with them? Cheers.
LikeLike
Hi Natalie
No not yet – Poter davis are still building the house over 1 year since site started/cut. Hopfully in the next month (or two)
LikeLike
Fantastic blog, I’ve loved reading through this. We’re preparing to build a Forsyth 38, and have run into the same issue with flooring though PD being terrible. I’ve had a look at O’Brien flooring, and they are great. However, we’ve run into a slight snag, and I’m wondering if you had a similar issue, and if so, how you got around it.
Currently, our bank is saying that they won’t sign off on a construction loan that doesn’t include floors and driveways, and that has to be part of the builders contract, not a third-party quote. Did you have this issue as well, and if so, how did you get around it? Were you able to get PD to write it into the contract, or did you manage to wrangle your bank around to accepting it?
LikeLike
Hi Nathan
No the bank did not ask us to have in included but then banks have tighten up over the past year. We also had enough money to pay for the floors out side of the contract and could prove that we had the savings to do so. The driveway is included in our House and land package so it was already included in the contract for us.
Thanks for ready the blog.
Charlotte
LikeLike
Great blog charlotte. We have decided to go with flooring xtra in qld. Our ss has the skirtings tacked in so it can be painted during the build and easily removed post handover.
LikeLike
Hats off to you Charlotte. You ha e put lots of efforts in this precious blog. We are planing to build with PD, and this information will give us confidence in coming up with all sorts of queries with sales consultant.
Let’s see how we go with our meeting.
Will keep you posted.
Thanks a lot for such valuable info.
Cheers
PD
LikeLike
Thanks a ton Charlotte, Your blog is a torch bearer for many newbies like us. We are also planning to build with PD and your blog helped us a lot on the things that we need to be aware and question. Glad that I unexpectedly came across your link.
We are also planning to opt-out the floor and our bank has allowed us to provide a third-party quote. But we are unsure about the occupancy approval in western suburbs of melbourne without floorboards, as PD will not allow any tradies before handover. We are also worried that PD might not be careful in levelling the concrete slab, as we are not profiting them in flooring, which will ultimately incur more charges for levelling. Could you please help, if there is a way to deal with it?
LikeLike
Hi Saru, you don’t need flooring in to be able to get an occupancy approval so that’s all good. As for laying the floor before hand over – yes we were told that we would not be allowed in but when it was about 2-3 weeks out our SS let them come in and do it, so it worked out in the end – it all depends on what kind of SS you get.
LikeLike